반응형
MediapPipe는 ML을 이용한 개발을 쉽게 할 수 있도록 도와주는 크로스 플랫폼이다.
얼굴, 손, 오브젝트 등 Tracking, recognition을 쉽게 할 수 있도록 해준다.
Android, MacOS, Windows,Python, C++, JavaScript 등을 지원해준다.
https://google.github.io/mediapipe/getting_started/python.html
MediaPipe in Python
Cross-platform, customizable ML solutions for live and streaming media.
google.github.io
1. 가상환경 생성
conda create -n mediapipe
2. 가상환경 활성화
conda activate mediapipe
3. MediaPipe 설치
pip install mediapipe
4. 예제 코드 만들기
Python file hand.py로 저장하기
(코드는 공식 홈페이지에서 참고하였습니다)
import cv2
import mediapipe as mp
mp_drawing = mp.solutions.drawing_utils
mp_drawing_styles = mp.solutions.drawing_styles
mp_hands = mp.solutions.hands

# For static images:
IMAGE_FILES = []
with mp_hands.Hands(
    static_image_mode=True,
    max_num_hands=2,
    min_detection_confidence=0.5) as hands:
  for idx, file in enumerate(IMAGE_FILES):
    # Read an image, flip it around y-axis for correct handedness output (see
    # above).
    image = cv2.flip(cv2.imread(file), 1)
    # Convert the BGR image to RGB before processing.
    results = hands.process(cv2.cvtColor(image, cv2.COLOR_BGR2RGB))

    # Print handedness and draw hand landmarks on the image.
    print('Handedness:', results.multi_handedness)
    if not results.multi_hand_landmarks:
      continue
    image_height, image_width, _ = image.shape
    annotated_image = image.copy()
    for hand_landmarks in results.multi_hand_landmarks:
      print('hand_landmarks:', hand_landmarks)
      print(
          f'Index finger tip coordinates: (',
          f'{hand_landmarks.landmark[mp_hands.HandLandmark.INDEX_FINGER_TIP].x * image_width}, '
          f'{hand_landmarks.landmark[mp_hands.HandLandmark.INDEX_FINGER_TIP].y * image_height})'
      )
      mp_drawing.draw_landmarks(
          annotated_image,
          hand_landmarks,
          mp_hands.HAND_CONNECTIONS,
          mp_drawing_styles.get_default_hand_landmarks_style(),
          mp_drawing_styles.get_default_hand_connections_style())
    cv2.imwrite(
        '/tmp/annotated_image' + str(idx) + '.png', cv2.flip(annotated_image, 1))
    # Draw hand world landmarks.
    if not results.multi_hand_world_landmarks:
      continue
    for hand_world_landmarks in results.multi_hand_world_landmarks:
      mp_drawing.plot_landmarks(
        hand_world_landmarks, mp_hands.HAND_CONNECTIONS, azimuth=5)

# For webcam input:
cap = cv2.VideoCapture(0)
with mp_hands.Hands(
    model_complexity=0,
    min_detection_confidence=0.5,
    min_tracking_confidence=0.5) as hands:
  while cap.isOpened():
    success, image = cap.read()
    if not success:
      print("Ignoring empty camera frame.")
      # If loading a video, use 'break' instead of 'continue'.
      continue

    # To improve performance, optionally mark the image as not writeable to
    # pass by reference.
    image.flags.writeable = False
    image = cv2.cvtColor(image, cv2.COLOR_BGR2RGB)
    results = hands.process(image)

    # Draw the hand annotations on the image.
    image.flags.writeable = True
    image = cv2.cvtColor(image, cv2.COLOR_RGB2BGR)
    if results.multi_hand_landmarks:
      for hand_landmarks in results.multi_hand_landmarks:
        mp_drawing.draw_landmarks(
            image,
            hand_landmarks,
            mp_hands.HAND_CONNECTIONS,
            mp_drawing_styles.get_default_hand_landmarks_style(),
            mp_drawing_styles.get_default_hand_connections_style())
    # Flip the image horizontally for a selfie-view display.
    cv2.imshow('MediaPipe Hands', cv2.flip(image, 1))
    if cv2.waitKey(5) & 0xFF == 27:
      break
cap.release()
5. 실행하기
python hand.py
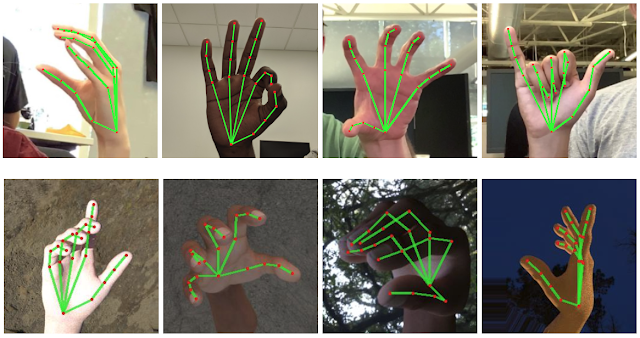
6. 결과
Hand landmarks마다 지정된 번호가 있으니 해당 정보를 활용하면
특정 제스처를 인식하는 등의 어플리케이션 개발이 가능 할 것이다.
참고를 위해 hand landmarks 의 번호 자료를 첨부하겠다. (공식 MediaPipe 사이트 참고)

참고 자료
[1] https://google.github.io/mediapipe/solutions/hands.html
반응형
'컴퓨터 > AI' 카테고리의 다른 글
| [Python] GPT 3 음성 인터랙션 - (Speech to Text 모듈) (0) | 2023.05.04 |
|---|---|
| [딥러닝 모델] SOTA(State-of-the-Art) 알고리즘, paperswithcode (0) | 2022.05.12 |